Unlocking Engine Performance: A Comprehensive Guide to Manifold Absolute Pressure (MAP) Sensor Testing
Related Articles: Unlocking Engine Performance: A Comprehensive Guide to Manifold Absolute Pressure (MAP) Sensor Testing
Introduction
With great pleasure, we will explore the intriguing topic related to Unlocking Engine Performance: A Comprehensive Guide to Manifold Absolute Pressure (MAP) Sensor Testing. Let’s weave interesting information and offer fresh perspectives to the readers.
Table of Content
Unlocking Engine Performance: A Comprehensive Guide to Manifold Absolute Pressure (MAP) Sensor Testing

The modern internal combustion engine is a marvel of engineering, relying on a complex interplay of systems to deliver efficient and reliable power. One crucial component in this intricate dance is the Manifold Absolute Pressure (MAP) sensor, responsible for measuring the pressure within the engine’s intake manifold. This information is vital for the engine control unit (ECU) to precisely regulate fuel delivery and ignition timing, ensuring optimal engine performance and fuel economy.
Understanding the MAP Sensor’s Role
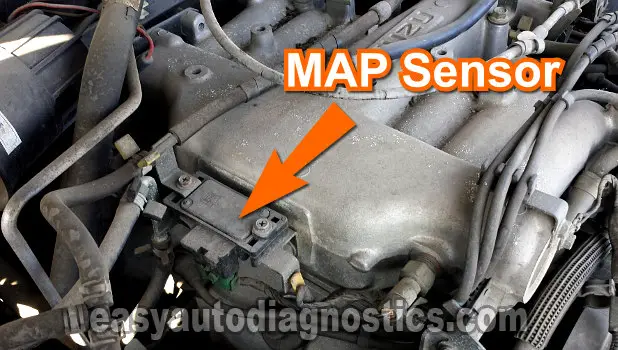
The MAP sensor, often a small, cylindrical device, is typically located in the intake manifold, close to the throttle body. It houses a diaphragm that responds to changes in pressure within the intake manifold. As air enters the manifold, the diaphragm flexes, altering the resistance within an internal circuit. This change in resistance is translated into a voltage signal, which is sent to the ECU.
The ECU uses this voltage signal, representing the absolute pressure within the intake manifold, to determine crucial parameters like:
- Air Mass: The ECU calculates the amount of air entering the engine based on the MAP sensor reading and other parameters like engine speed and temperature.
- Fuel Injection Duration: Knowing the air mass, the ECU can precisely control the amount of fuel injected into the cylinders, ensuring an optimal air-fuel mixture for combustion.
- Ignition Timing: The MAP sensor data helps the ECU adjust ignition timing to optimize combustion efficiency and reduce emissions.
Why Test the MAP Sensor?
A malfunctioning MAP sensor can significantly impact engine performance and fuel economy. Common symptoms of a faulty MAP sensor include:
- Rough Idle: An erratic idle, fluctuating between high and low RPMs, is a telltale sign of a faulty MAP sensor.
- Stalling: The engine may stall, especially at low RPMs, due to incorrect fuel delivery caused by inaccurate MAP sensor readings.
- Poor Acceleration: The engine may struggle to accelerate, lacking power due to an improper air-fuel mixture.
- Increased Fuel Consumption: A faulty MAP sensor can lead to an overly rich fuel mixture, resulting in higher fuel consumption.
- Check Engine Light: The ECU will often illuminate the check engine light, indicating a fault in the MAP sensor circuit.
Testing the MAP Sensor: A Step-by-Step Guide
Testing a MAP sensor involves verifying its functionality and ensuring it provides accurate pressure readings. The following steps outline a comprehensive approach:
- Visual Inspection: Begin by visually inspecting the MAP sensor for any signs of damage, corrosion, or loose connections. A cracked or broken sensor housing, loose wiring, or signs of oil contamination can indicate a faulty sensor.
- Check for Vacuum Leaks: A vacuum leak in the intake manifold can affect the MAP sensor’s readings. Inspect the intake manifold for cracks, loose clamps, or damaged hoses that could cause a leak.
-
Voltage Test: Use a digital multimeter to measure the voltage output of the MAP sensor. This requires accessing the sensor’s electrical connector and identifying the appropriate terminals.
- With the engine off, the voltage should be close to 5 volts.
- When the engine is running, the voltage should fluctuate with engine load and RPM.
- If the voltage is consistently low or high, or fails to fluctuate, it indicates a faulty sensor.
-
Pressure Test: This test requires a specialized tool, a vacuum pump, and a pressure gauge.
- Connect the vacuum pump to the MAP sensor’s port.
- Apply a specific vacuum pressure (consult the manufacturer’s specifications) and observe the voltage output using a multimeter.
- Compare the readings against the manufacturer’s specifications to determine if the sensor is functioning within the acceptable range.
-
Resistance Test: While less common, some MAP sensors can be tested for resistance using a multimeter.
- Locate the sensor’s terminals and measure the resistance between them.
- Compare the measured resistance with the manufacturer’s specifications.
FAQs about MAP Sensor Testing
Q: Can I test the MAP sensor without removing it from the vehicle?
A: Yes, you can test the voltage output and resistance of the MAP sensor without removing it. However, a pressure test requires disconnecting the sensor.
Q: What are the common causes of a faulty MAP sensor?
A: Common causes include:
- Physical damage: Cracks, breaks, or contamination in the sensor housing.
- Electrical failure: Open or short circuits in the wiring or connector.
- Internal diaphragm failure: The diaphragm may become worn or damaged, affecting its ability to respond to pressure changes.
Q: How often should I test my MAP sensor?
A: It’s recommended to test the MAP sensor as part of routine engine maintenance, especially if you experience any of the symptoms mentioned earlier.
Q: Can I replace the MAP sensor myself?
A: Replacing a MAP sensor is a relatively straightforward task for those with basic mechanical skills. However, consult your vehicle’s repair manual for specific instructions and precautions.
Tips for Successful MAP Sensor Testing
- Use a reliable multimeter: Ensure your multimeter is calibrated and in good working order for accurate voltage and resistance readings.
- Consult the manufacturer’s specifications: Always refer to the manufacturer’s specifications for the specific MAP sensor you are testing, as testing procedures and acceptable ranges may vary.
- Be cautious with electrical connections: Avoid damaging the sensor’s wiring or connector when making electrical connections.
- Clean the sensor thoroughly: Before installing a new MAP sensor, clean the sensor housing and surrounding area to prevent contamination.
- Perform a test drive after replacement: After replacing the MAP sensor, perform a test drive to confirm that the engine is running smoothly and the check engine light is no longer illuminated.
Conclusion
The MAP sensor plays a vital role in ensuring optimal engine performance and fuel economy. Regularly testing the MAP sensor can help identify potential problems before they escalate into major issues. A malfunctioning MAP sensor can lead to a range of symptoms, including rough idling, stalling, poor acceleration, and increased fuel consumption. By understanding the importance of the MAP sensor and conducting regular tests, vehicle owners can maintain their engine’s health and ensure a smooth and efficient driving experience.


Closure
Thus, we hope this article has provided valuable insights into Unlocking Engine Performance: A Comprehensive Guide to Manifold Absolute Pressure (MAP) Sensor Testing. We appreciate your attention to our article. See you in our next article!